How to Make the Best Homemade Cinnamon Rolls from Scratch

There’s something undeniably comforting about the aroma of freshly baked cinnamon rolls wafting through your home. Whether it’s a lazy Sunday morning or a special holiday breakfast, cinnamon rolls are a universal favorite that can make any day feel extraordinary. If you’ve ever wanted to master the art of making cinnamon rolls from scratch, you’re in the right place!
In this post, we’re diving deep into the world of homemade cinnamon rolls. From mixing the dough to perfecting that creamy icing, we’ve got you covered with tips, tricks, and step-by-step instructions. By the end, you’ll be a cinnamon roll pro, ready to impress family and friends with your baking skills.
So, let’s roll up our sleeves and get started on making the best cinnamon rolls you’ve ever tasted!
The Magic of Homemade Cinnamon Rolls
What makes homemade cinnamon rolls so special? It’s the combination of soft, pillowy dough, a gooey cinnamon-sugar filling, and a generous layer of cream cheese icing. When made from scratch, these rolls have a freshness and flavor that store-bought versions simply can’t match.
But beyond the taste, there’s something truly rewarding about the process itself. Kneading the dough, watching it rise, and finally, pulling those golden-brown rolls out of the oven is an experience that connects you to generations of bakers before you. Plus, nothing beats the pride of serving up a batch of homemade cinnamon rolls and seeing the smiles they bring.
Getting Started: The Ingredients
Before we dive into the recipe, let’s talk about the ingredients. Here’s what you’ll need:
For the Dough:
- Yeast: We’ll be using 2 ¼ teaspoons of yeast, which is about one packet. Yeast is the magic ingredient that makes our dough rise and become fluffy.
- Warm Milk: 1 cup of warm milk is needed to activate the yeast. Make sure it’s warm, not hot, to avoid killing the yeast.
- Sugar: ½ cup of sugar is used to sweeten the dough and feed the yeast.
- Butter: ⅓ cup of softened butter adds richness and flavor to the dough.
- Salt: 1 teaspoon of salt balances the sweetness and enhances the overall flavor.
- Eggs: 2 eggs provide structure and tenderness to the dough.
- Flour: 4 cups of flour give the dough its body and texture.
For the Filling:
- Brown Sugar: 1 cup of brown sugar creates that classic sweet and sticky cinnamon filling.
- Cinnamon: 3 tablespoons of cinnamon for a warm, spicy kick.
- Butter: ⅓ cup of softened butter helps the filling spread evenly over the dough.
For the Cream Cheese Icing:
- Butter: 6 tablespoons of softened butter for a rich, creamy base.
- Powdered Sugar (10X): 1 ½ cups of powdered sugar makes the icing sweet and smooth.
- Cream Cheese: ¼ cup of cream cheese adds tang and creaminess.
- Vanilla: ½ teaspoon of vanilla extract for flavor.
- Salt: A pinch (⅛ teaspoon) of salt to balance the sweetness.
Step-by-Step Guide to Making Cinnamon Rolls
Now that we have our ingredients, it’s time to start baking! Follow these steps to create the perfect cinnamon rolls:
Step 1: Activate the Yeast
Start by warming your milk to about 110°F (just warm to the touch). Pour the warm milk into a large mixing bowl and sprinkle the yeast over the top. Let it sit for about 5 minutes until the yeast becomes frothy. This step is crucial because it ensures that your yeast is alive and ready to work its magic on the dough.
Step 2: Mix the Dough
Once the yeast is activated, add the sugar, softened butter, salt, and eggs to the bowl. Mix everything together until it’s well combined. Gradually add the flour, one cup at a time, mixing after each addition. You’ll know the dough is ready when it starts to pull away from the sides of the bowl and is slightly sticky to the touch.
Step 3: Knead the Dough
Transfer the dough to a lightly floured surface and knead it for about 5-7 minutes. Kneading helps develop the gluten in the flour, which gives the dough its elasticity and structure. The dough should become smooth and elastic as you knead it. If it’s too sticky, sprinkle a little more flour on your work surface.
Step 4: Let the Dough Rise
Place the kneaded dough into a greased bowl, cover it with a damp cloth, and let it rise in a warm place for about 1 hour, or until it has doubled in size. This rising time allows the yeast to ferment and produce gas, which makes the dough light and airy.
Step 5: Prepare the Filling
While the dough is rising, it’s time to prepare the filling. In a small bowl, mix together the brown sugar and cinnamon. Set this aside. When the dough is ready, you’ll spread this mixture over it along with the softened butter.
Step 6: Roll Out the Dough
After the dough has risen, punch it down to release the gas and transfer it to a floured surface. Roll the dough out into a large rectangle, about 16×12 inches in size. The dough should be thin but not too thin; you want it to hold the filling without tearing.
Step 7: Add the Filling
Spread the softened butter evenly over the rolled-out dough. Then, sprinkle the cinnamon-sugar mixture over the butter, making sure it covers the entire surface. The combination of butter, sugar, and cinnamon is what gives cinnamon rolls their iconic flavor and gooey center.
Step 8: Roll and Cut the Dough
Starting from the long side, tightly roll the dough into a log. Use a sharp knife or dental floss to cut the log into 12 equal slices. Place the slices in a greased 9×13-inch baking pan, making sure to space them evenly.
Step 9: Second Rise
Cover the pan with a cloth and let the rolls rise for an additional 30 minutes. During this time, the rolls will puff up and become even more fluffy. This second rise is important for achieving that perfect texture.
Step 10: Bake the Rolls
Preheat your oven to 350°F (175°C). Once the rolls have risen, bake them in the preheated oven for 20 minutes, or until they’re golden brown and the centers are cooked through. Your kitchen will be filled with the most amazing aroma as they bake!
Step 11: Prepare the Cream Cheese Icing
While the rolls are baking, it’s time to make the cream cheese icing. In a medium bowl, beat the softened butter and cream cheese until smooth. Gradually add the powdered sugar, beating until the icing is creamy and smooth. Stir in the vanilla extract and salt.
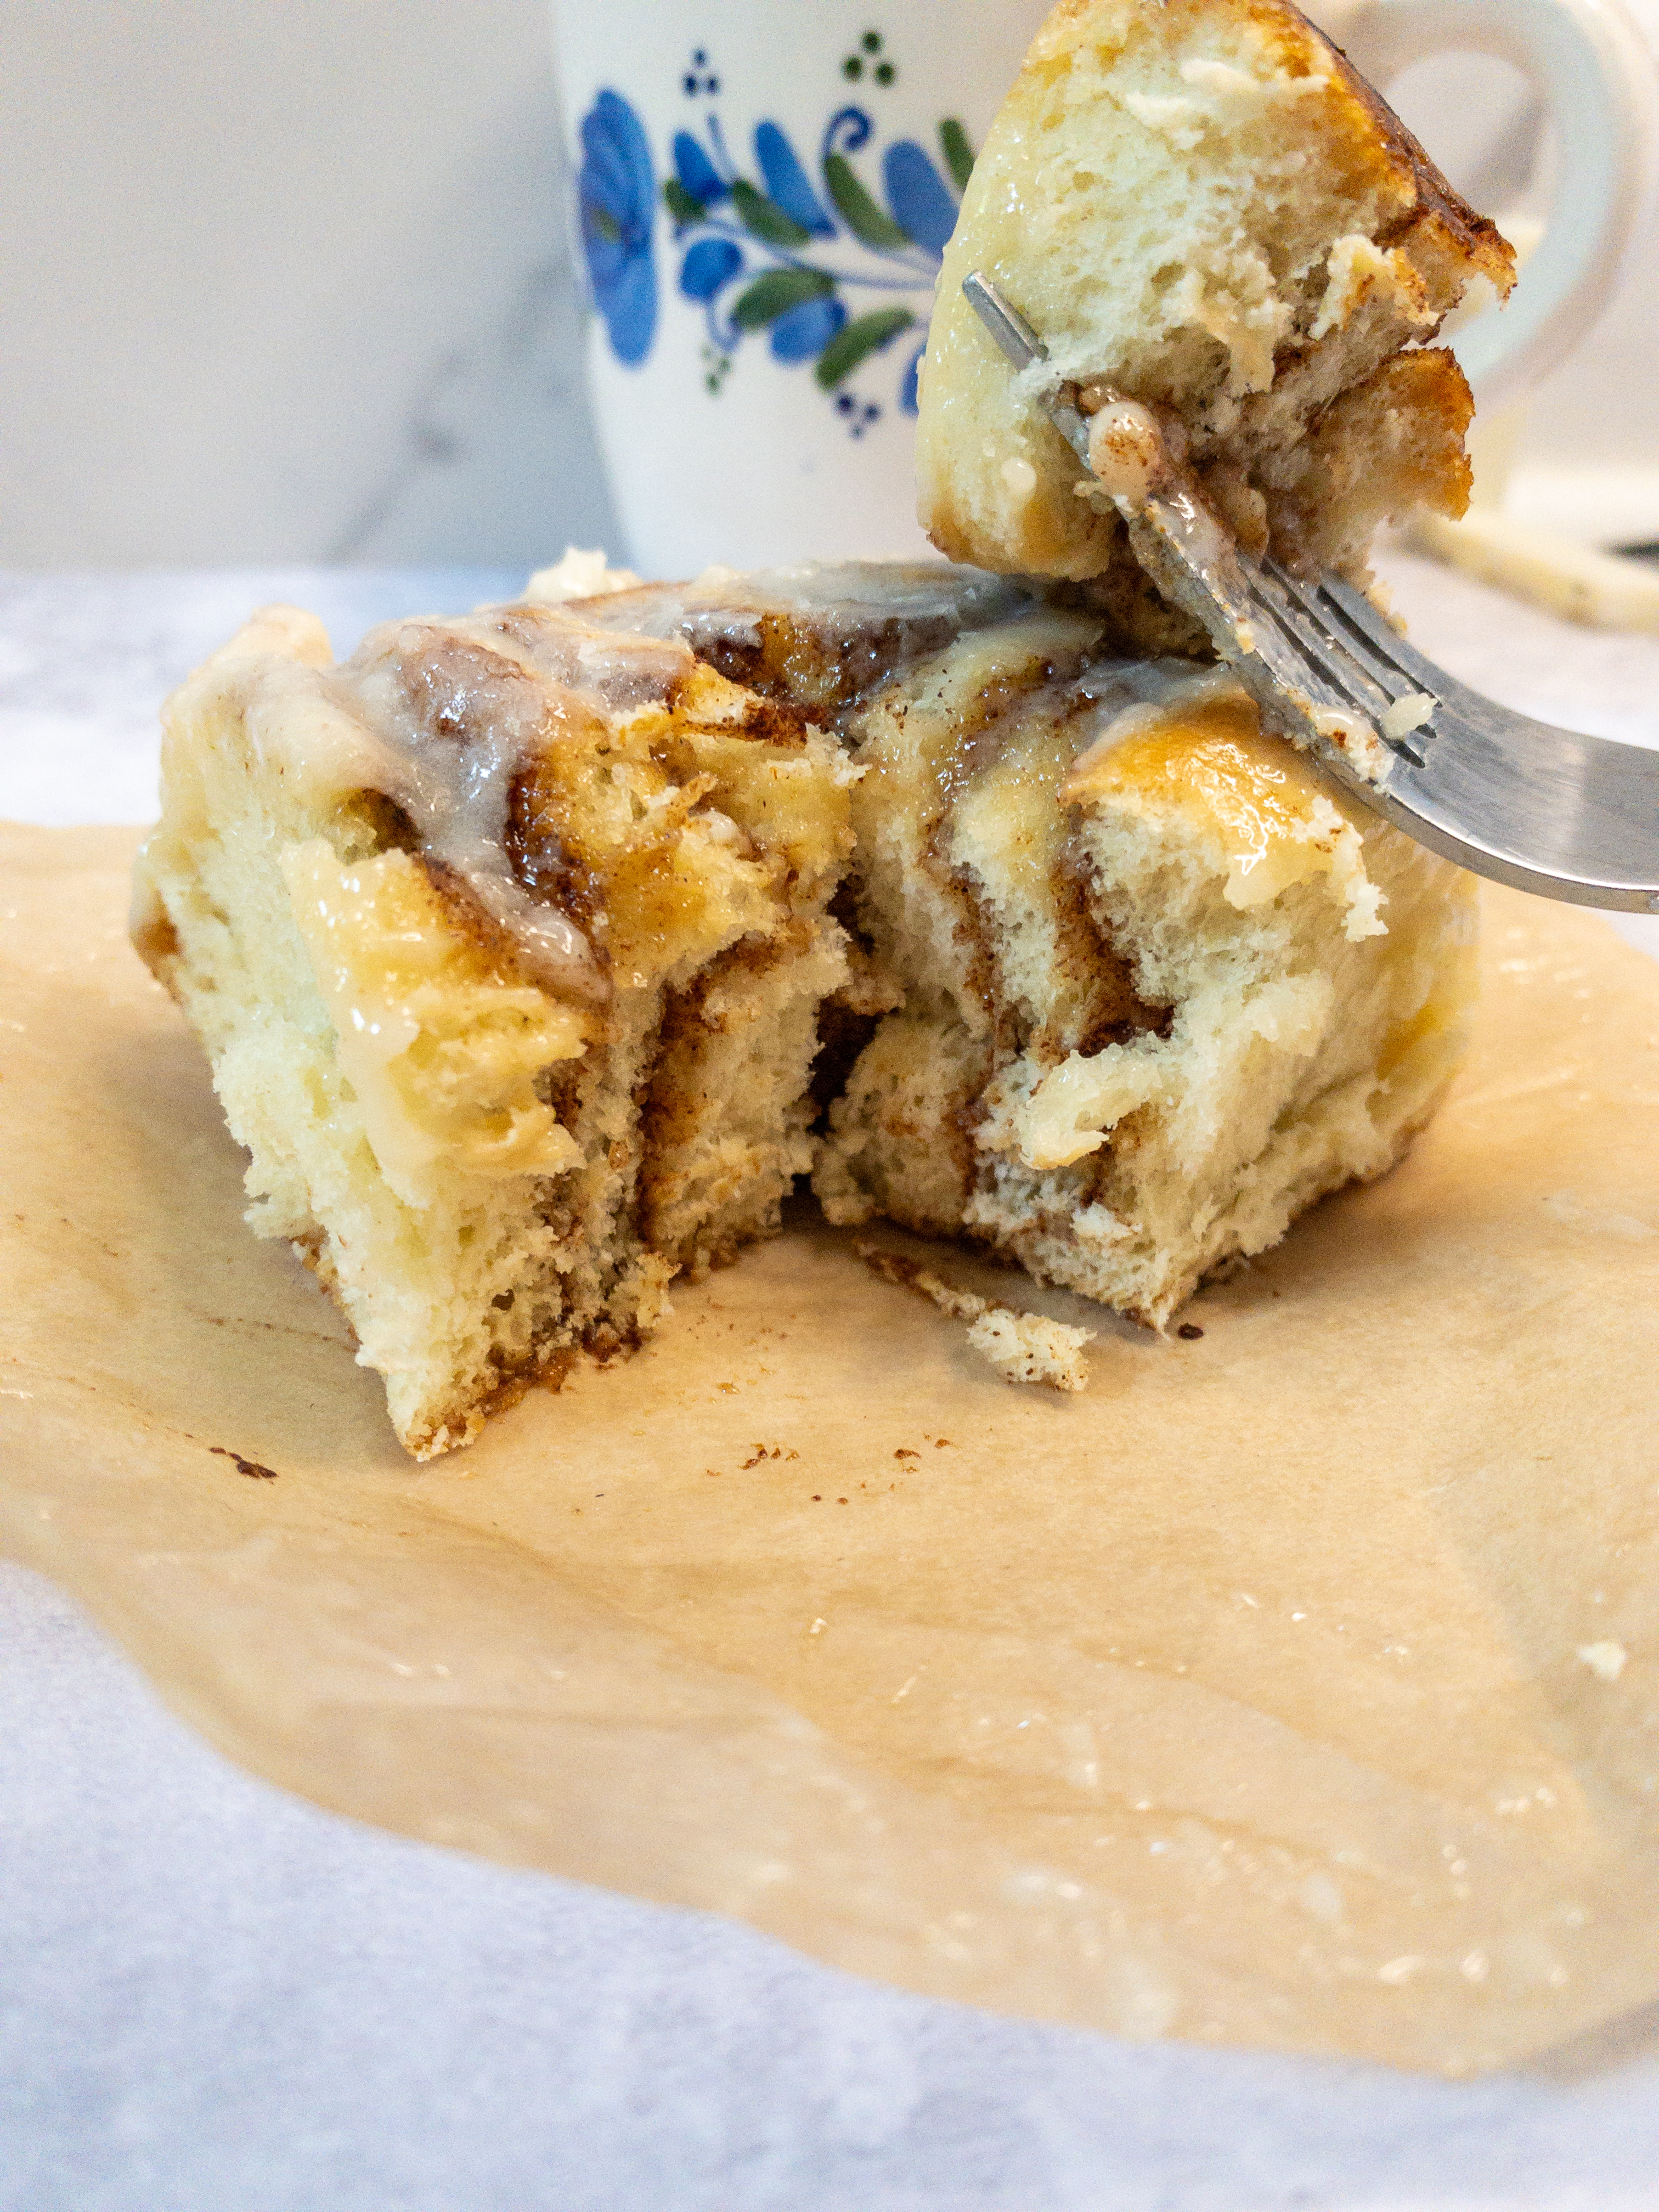
Step 12: Ice the Rolls
Once the cinnamon rolls are done baking, let them cool for a few minutes before spreading the cream cheese icing generously over the top. The icing will melt slightly and seep into the rolls, making them even more delicious.
Step 13: Serve and Enjoy!
Your homemade cinnamon rolls are ready to be enjoyed! Serve them warm with a cup of coffee or hot chocolate for the ultimate breakfast or dessert treat.
Tips and Tricks for Perfect Cinnamon Rolls
- Room Temperature Ingredients: Make sure your butter, eggs, and cream cheese are at room temperature before you start. This ensures that they mix together smoothly and evenly.
- Don’t Over-Knead: While kneading is important, be careful not to overdo it. Over-kneading can make the dough tough, leading to denser rolls.
- Use Dental Floss to Cut the Dough: Dental floss is a great tool for cutting the rolled dough into slices without squishing it. Simply slide a piece of floss under the roll, cross the ends over the top, and pull to cut.
- Overnight Option: If you want to prep these rolls the night before, you can let them rise overnight in the fridge after placing them in the pan. In the morning, let them come to room temperature before baking.
- Experiment with Fillings: While the classic cinnamon-sugar filling is hard to beat, you can experiment with other fillings like chocolate, nuts, or fruit preserves for a unique twist.
Serving Suggestions
Cinnamon rolls are incredibly versatile and can be enjoyed in many ways:
- Classic Breakfast: Serve warm cinnamon rolls with a side of scrambled eggs, bacon, and a hot cup of coffee for a hearty breakfast.
- Brunch Spread: Pair cinnamon rolls with fresh fruit, yogurt, and mimosas for a delightful brunch spread.
- Dessert: For a decadent dessert, serve cinnamon rolls with a scoop of vanilla ice cream or a drizzle of caramel sauce.
- On-the-Go Snack: Cinnamon rolls are also a great grab-and-go snack. Wrap them individually and take them with you for a sweet treat on the run.
Storage and Reheating
If you have leftovers (which is rare because they’re so delicious!), here’s how to store and reheat your cinnamon rolls:
- Storage: Store leftover cinnamon rolls in an airtight container at room temperature for up to 2 days. For longer storage,
keep them in the fridge for up to a week.
- Reheating: To reheat, place a roll on a microwave-safe plate and heat for 15-20 seconds. You can also reheat them in the oven at 300°F (150°C) for about 10 minutes to bring back that fresh-baked taste.
- Freezing: Cinnamon rolls can be frozen either baked or unbaked. If freezing unbaked, place the rolls in the pan, cover tightly, and freeze. When ready to bake, let them thaw in the fridge overnight and then bake as directed. If freezing baked rolls, wrap them individually and freeze for up to 3 months. Reheat directly from frozen in a 350°F oven for 15-20 minutes.
To Wrap Up
Making homemade cinnamon rolls might seem like a labor of love, but the end result is more than worth it. With this recipe, you’ll be able to create soft, fluffy, and utterly delicious cinnamon rolls that are perfect for any occasion. Whether you’re enjoying them for breakfast, brunch, or dessert, these cinnamon rolls are sure to become a family favorite.
Homemade Cinnamon Rolls
Ingredients
Dough
- 2 1/4 tsp Yeast
- 1 Cup Warm Milk around 110 degrees Fahrenheit
- 1/2 Cup Sugar
- 1/3 Cup Butter Softened
- 1 tsp Salt
- 2 Eggs
- 4 Cups Flour
Filling
- 1 Cup Brown Sugar
- 3 Tbsp Cinnamon
- 1/3 Cup Butter Softened
Cream Cheese Icing
- 6 Tbsp Butter Softened
- 1 1/2 Cups Powdered Sugar
- 1/4 Cup Cream Cheese Softened
- 1/2 tsp Vanilla Extract
- 1/8 tsp Salt
Instructions
- Activate yeast in warm milk and let sit for 5 minutes.
- Mix in sugar, butter, salt, eggs, and flour. Knead dough for 5-7 minutes.
- Let dough rise in a greased bowl for 1 hour.
- Prepare filling by mixing brown sugar and cinnamon. Set aside.
- Roll out dough on a floured surface, spread butter, and sprinkle with cinnamon-sugar mixture.
- Roll dough into a log and cut into 12 slices. Place in a greased pan.
- Let rolls rise for an additional 30 minutes.
- Bake in a preheated oven at 350°F for 20 minutes.
- While baking, prepare icing by beating together butter, cream cheese, powdered sugar, vanilla, and salt.
- Once rolls are baked, let cool slightly before spreading with cream cheese icing.
- Serve warm and enjoy!
There is nothing a love more than a homemade cinnamon roll! I can’t wait to try to make these!
Thank you so much! There’s truly nothing like a homemade cinnamon roll fresh out of the oven. I can’t wait for you to try these—let me know how they turn out for you!
It’s been so long since I’ve eaten cinnamon rolls, but as soon as I saw your recipe, it made me want to eat them again. I’m not the best baker, but I’d still like to try it. Love the dental floss tip, so ingenious. Thanks for sharing!
Thank you! I’m so glad the recipe inspired you to try cinnamon rolls again. The dental floss tip really is a game-changer, just don’t forget to use unflavored! let me know how they turn out!
Looks delicious, and I love that they’re made from scratch. Thanks for sharing!
Thank you! There’s nothing like homemade cinnamon rolls—I hope you enjoy them!
Wow, what an amazing guide! I’ve always wanted to try making cinnamon rolls from scratch, and your step-by-step instructions make it feel so achievable. I love the extra tips for getting that perfect gooey texture—exactly what a cinnamon roll should be! Thank you for sharing this recipe; I can’t wait to surprise my family with a fresh batch. Your blog is such a wonderful resource for delicious yet approachable recipes!
Thank you so much for your kind words! I’m thrilled to hear the guide feels approachable—it’s so rewarding to make cinnamon rolls from scratch. I’m sure your family will love the gooey, fresh-baked goodness! Let me know how they turn out, and I’m so glad you’re enjoying the recipes on my blog!
I’m not much of a baker but these look so delicious! And I am going to have to give it a try. My mouth is drooling just writing this! Thank you for the clear instructions!
I’m so glad the instructions feel approachable—I promise it’s worth the effort! I can’t wait for you to try them—enjoy every bite!
Jenna,
This was my first time making cinnamon rolls, and thanks to your recipe and instructions, it was so simple. Thank you for sharing your recipe; they are the best cinnamon rolls!
Thank you so much! I’m thrilled your first time making cinnamon rolls was a success—that means so much to me! Enjoy every bite!
I love all of your recipes but I always end up at the dessert section! Trying these this week.
Thank you so much! The dessert section is hard to resist—I hope you love the cinnamon rolls!
Absolutely will try this looks delish 🫶🏼
This recipe has me craving a cinnamon roll! I can’t wait to try this out soon. Great post!
These look incredible! I’m going to try them